Via bravetart.com
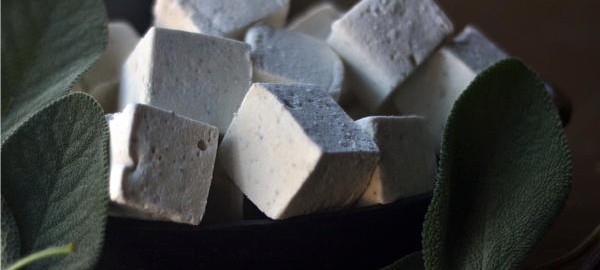
Brown Butter Sage
Be sure to chop the sage into the most tiny pieces you can. If the sage pieces have any length to them whatsoever, they’ll wrap themselves around the whisk attachment, clump together, and essentially remove themselves from the marshmallows in the process. As an alternative, you can grind the sage into the sugar in a food processor. This gives the marshmallows a nice pale green hue and a slightly stronger sage flavor. It’s my favorite method, but not everyone has a food processor, and a knife gets the job done too if you’re willing to take your time.
Brown Butter Sage Marshmallows
1.5 ounces gelatin
8 ounces cold water
3/4 ounce fresh sage, chopped as finely as you can manage
11 ounces corn syrup
8 ounces water
28 ounces sugar
1 teaspoon salt
6 ounces unsalted butter (or 4 ounces prepared brown butter, melted)
ample powdered sugar for dusting
Unless you have a supercharged motor on your hand mixer, I don’t think it will survive this recipe. Use a stand mixer if at all possible.
Have a lightly greased 9”x13” pan ready.
Combine the gelatin and water together in the bottom of a stand mixer bowl. Set aside.
In a largish, heavy bottomed pot, combine the sage, corn syrup, water, sugar and salt. Set over medium heat and stir gently, taking care to not splash liquid (and thus sugar crystals) up the sides of the bowl. Once the mixture starts to simmer, stop stirring and let it cook undisturbed until the mixture reaches 240°. Shut off the heat and let it stand until it cools to 210°. This is important; if the syrup has not sufficiently cooled it will prevent the gelatin from setting up properly.
Meanwhile, prepare the brown butter. In a small skillet, melt the butter over low heat. Turn the heat to medium low and cook the melted butter until it simmers, bubbles, stops bubbling, and begins to brown. Once the butter has turned a nice golden brown, remove the skillet from the heat and set aside until needed.
Once the marshmallow mixture has cooled to 210°, pour it into the mixing bowl with the awaiting gelatin. Fit the bowl with the whisk attachment and crank it up to medium speed. Keep whipping until the mixture has more than doubled.
Now drizzle in the browned butter, a tablespoonful at a time. At first, it will resist incorporating and a buttery barrier will form between the marshmallow stuck to the bowl an the marshmallow caught in the whisk attachment. Just keep mixing. It will all come together and incorporate in the end. Once you’ve added all the butter, including any browned bits stuck to the bottom of the skillet, crank the speed up to high for a few moments, just to make sure the whole mixture has evenly whipped.
Once you’ve shut off the mixer, scrape the marshmallow goo into the prepared pan. Lift up and smack the pan a few times against the counter to dislodge any air bubbles and help it level out.
Dust the top of the giant marshmallow with some powdered sugar, cover in plastic and refrigerate overnight.
To cut the marshmallows, prepare a cutting board by dusting it generously with powdered sugar. Take your pan of chilled marshmallows and literally reach your fingers between the ‘mallow and the pan, and pull that guy right outta there.
Dust the exposed bottom of the ‘mallow with some more powdered sugar.
Use a chef’s knife to cut the marshmallows into about 13, 1” strips. You’ll have to stop periodically and clean your knife under hot, running water. Always dry your knife thoroughly after this step. Once the strips are cut, roll them about in some powdered sugar so none of the sides are sticky.
Now use the knife to cut each strip at 1” increments. Of course, the marshmallows are probably close to 2” tall, so they won’t be perfect cubes, but rather rectangles.
Toss these cut pieces in more powdered sugar to prevent them from sticking.
Store these guys in an airtight container or a big zippy bag. They’re essentially nothing but sugar, so they have a terrific shelf life. Weeks at room temperature, months in the fridge, indefinitely in the freezer.
These make for a killer, upscale s’more, by the way…
Recipe 2
Vanilla Bean Marshmallows
1.5 ounces gelatin
8 ounces cold water (or coffee, mmmmm, coffee marshmallows…)
11 ounces corn syrup, honey, or maple syrup
8 ounces water
28 ounces sugar
1/2 tsp salt
1 vanilla bean, seeds scraped and pod reserved for another use
ample powdered sugar for dusting (1 cup or more)
Unless you have a supercharged motor on your hand mixer, I don’t think it will survive this recipe. Use a stand mixer if at all possible.
Have a lightly greased 9”x13” pan at the ready.
So. Combine the gelatin and water together in the bottom of a stand mixer bowl. Set aside.
In a largish, heavy bottomed pot, combine the syrup, water, sugar, salt, and vanilla bean scrapings. Set over medium heat and stir gently, taking care to not splash liquid (and thus sugar crystals) up the sides of the bowl. Once the mixture starts to simmer, stop stirring and put a lid on it for 5 minutes, letting it go to town (this lets some steam build up in the pot to “steam off” any sugar crystals stuck on the sides of the pot.).
Warning: if you use honey, the smell will be awful. Barnyard and hay and all kinds of musty awful. The end result will taste awesome, but getting there will fill you with doubt. Hold the course. It’ll get better.
After 5 minutes, remove the lid and stick in a candy thermometer.
Keep cooking, undisturbed, until the mixture reaches 240°. Then shut off the heat and let it stand until it cools to 210°. This is important.
Once the mixture has cooled to 210°, and taking a goodly amount of caution as this mixture is super hot, pour all of it into the mixing bowl with the awaiting gelatin. Fit the bowl with the whisk attachment and crank it up to medium-high speed.
You are gonna let this thing whip it, whip it good until the mixture has really increased in volume, doubled? tripled? It will nearly exceed the bowl at any rate.
Once you’ve shut off the mixer, move quickly. There’s no delicate way to put this: it’s gonna be a sticky mess. But that’s half the fun, so don’t stress it. Set the whisk attachement aside (or give it to a small child if you really want to see what a mess looks like) and scrape the marshmallow goo into the prepared pan.
Get your fingers a little damp and pat down the mixture. Lift up and smack the pan a few times against the counter to dislodge any air bubbles and help it level out more. The goal is for more or less even.
Dust the top of the giant marshmallow with some powdered sugar, cover in plastic and refrigerate 4 hours or overnight.
Rejoice! You’ve done all the hard work, now for the best part!!!
Get a cutting board ready by dusting it with powdered sugar. Take your pan of chilled marshmallows and literally reach your fingers between the ‘mallow and the pan, and pull that guy right outta there.
You’re now holding one giant marshmallow pillow. OMG, right?
Dust the exposed bottom of the ‘mallow with some more powdered sugar. If you’re anything like me, you’ll have to resist the urge to sleep on it. It feels like a Tempurpedic pillow. It is soft and ever so squishy and silky smooth. Have I mentioned this is my favorite???
Use a hot knife to cut the marshmallows into about 13, 1” strips. You’ll have to stop periodically and clean your knife. Once the strips are cut, roll them about in some powdered sugar so none of the sides are sticky.
Now use the knife to cut each strip at 1” increments. Of course, the marshmallows are probably close to 2” tall, so they won’t be perfect cubes, but rather rectangles.
Toss these cut pieces in more powdered sugar to prevent them from sticking.
So store these guys in an airtight container or a big zippy bag. They’re essentially nothing but sugar, so they have a terrific shelf life. Weeks. Months even, if you refrigerate them. A year in the freezer.
Fresh Berry Marshmallows
Make a double batch of strawberry or blueberry reduction. Use the reduction to replace all of the water and the corn syrup in the recipe. It’s a simple 1-to-1 substitution. Decrease the sugar by 8 ounces and increase the salt to 3/4 tsp to account for the extra sugar the reduction contributes.
During the final whipping stage, right before you call it quits, taste the marshmallow fluffy. If you’d like more berry flavor, drizzle in up to 5 more ounces of reduction. Whip until fully incorporated, and proceed as usual.
Pink Peppermint Marshmallows
Follow the basic recipe exactly and just before you finish mixing add in 1/4 tsp peppermint oil. Let the mixture whip a few seconds, then taste the marshmallow fluff to see if it is suitably minty for your tastes. You can always add more, but you can’t take it away, so keep adding in 1/4 tsp increments until you’re happy with the flavor.
Add in a few drops of red food coloring or gel paste. For a marbled effect, fold the mixture with a spatula before transferring the marshmallow goo into the pan. For a uniformly pink color, whip on the mixer a few extra seconds and then transfer to the prepared pan.
Cut into heart shapes, if you like. I did.
Brown Butter and Sage Marshmallows
Brown Butter Sage Marshmallows make the ultimate topping for Thanksgiving sweet potato casserole. I have previously raved on the topic, so I will refrain from doing so again.
Even though it’s essentially just a variation of this basic recipe, I’ve decided to dedicate a whole page to the topic. These marshmallows deserve it. Click here for the recipe.
Smoked Vanilla Bean Marshmallows
To make City Slicker Campfire S’mores you start with vanilla bean marshmallows and add smoke.
I’ve done this two ways, by a) actually soaking a vanilla bean in water and letting it smoke out on the grill and b) using liquid smoke.
Liquid smoke is by far the easier, more elegant solution. I mean, if you have a grill on which to smoke the vanilla beans, you have a place to toast said marshmallows and thus obviate the need to imbue the marshmallows with smoke.
The key to using liquid smoke lies in psychotic restraint. A drop or two, a 1/4 tsp at the absolute most, will give a batch of marshmallows a really lovely, gentle smokey vibe. But the line between “Aww, it’s like a campfire!” and “$%*&, it’s like a campfire!” is very thin.
Also, you must be sure not to buy the “Mesquite” type of liquid smoke, lest you end up with BBQ flavored marshmallows.
So, follow the recipe above, and when you’ve finished mixing, turn the speed down to low and add in the liquid smoke, a little at a time and tasting along the way, until it’s as smokey as you enjoy. Be sure to let it mix thoroughly after each addition for even distribution.
Carry on with panning the marshmallows as described above.
If anyone is interested in actually smoking their vanilla beans, leave a comment and I’ll elaborate.