Via sweetapolita.com
As a devoted cake fanatic, it’s important to me that I have a respectable collection of amazing cake recipes, including some that I can whip up at the last minute, if needed, and that can hold their own without being super fanciful or frilly–just plain decadent, addictive, and, yes, impressive (who doesn’t want to impress, right?). Let me tell you, this cake is the ultimate dessert for pretty much any occasion, or any day at all, both in appearance and taste–it’s utterly divine. I find it especially comforting in the fall and winter, since it has such a rustic quality to it. Hummingbird Cake is a Southern dessert, which was said to have originated in Jamaica. After reading more about it on The Food Timeline website, I learned that the first print reference to it as “Hummingbird Cake” was in 1978, when a Mrs. L.H. Wiggins from Greensboro, North Carolina submitted the recipe to Southern Living Magazine. If you aren’t familiar with this cake, it is very similar to Carrot Cake, but well, has no carrots, but rather bananas, pineapple, cinnamon, and pecans, to name a few. Filled and frosted with rich-yet-fluffy Cream Cheese Icing, adults and kids alike seem to love it–it is truly a crowd-pleaser and one of my personal favourites. I have made it many times as a standard 3-layer cake, but decided that it was time to make it more visually interesting and create a “sky-high” version. Here’s how it went:

I decided to make the cake 8″ round, with many thin layers, resulting in a nice tall cake with serious impact. I started with my 3 x 8″ round pans, and baked one batch of the cake batter, filling each of them equally. Once those were baked and cooled, and removed from the pans, I made another batch and baked 3 more.
![]()
Oh, how I love this recipe. Not only is it so straightforward, but it also doesn’t require an electric mixer. Truth is, I adore my gorgeous KitchenAid mixers, and I use them for almost every single thing I make, but I have to admit I feel so much more authentic with a wooden spoon and mixing bowls. It’s almost as though stirring it all by hand yields a more heartfelt cake. And no, I’m not exactly sure what that means either, but it’s the truth.
![]()
Once all of my cakes were cooled on the racks, I put them in the fridge overnight, very tightly wrapped in saran and covered. If you don’t have that much time, you can even wrap them and put them in the freezer for an hour, or so. If you try to slice into a soft, room temperature cake, you’ll likely end up with a crumby mess, and no one likes a crumby mess. Oh, well, except my little Reese–she can smell stray cake crumbs straight from upstairs, but pretty much the rest of us like cakes to slice nice and clean. In the morning I started the torting process (otherwise known as slicing a cake into layers–in this case, slicing layers into more layers). Now, personally, I prefer to do this with my super-sharp MAC serrated knife, rather than with a Cake Leveler (a tool on the market). I’m not sure why I resist such cake-aides, but like I mentioned, I feel much more authentic doing things the old-fashioned way. In this case, each cake layer is being sliced one time, resulting in 2 layers per, well, layer. Confused yet?

So, here you can see how much fun building a sky-high cake is–it’s like creating the ultimate cake sandwich (minus all of those healthy ingredients). And in this photo, it still needed its top layer, making it super tall and lovely. I made this cake with a total of 9 layers (I used extra batter and made a loaf), but you can make it any height you want. I, personally, may never make a standard height cake ever again, truly! This just may get out of control in a hurry. Now, don’t panic if your layers aren’t perfect (once filled, iced, and sliced, it is pretty forgiving), but do your best to cut them evenly, since that makes for an especially pleasing inside-view. As Martha Stewart once said about torting a cake, “Just think straight while you are slicing,” (or something to that effect) and that’s exactly what I do. I also score the cake where I want my knife to be inserted, all the way around gently, so that when I do actually do the slicing, I have a guide. So, after I sliced the first cake into two layers and put a little bit of icing on an 8″ round thin cake board, I put them each cut side up and filled each layer with the Fluffy Cream Cheese Icing. When you decide your cake is tall enough, you take the cut side of the top layer and place it face down.

Here’s the cake crumb-coated, chilled, and ready for the final and decorative layer of icing. I make sure the cake is really cold (about an hour in the fridge) before I add the final layer of icing. To crumb-coat, you can use an offset palette knife for the top and a large regular palette knife for the sides. You can see that after this stage, it’s not meant to be beautiful or perfect, but soon enough! Really, you’re just sealing in the crumbs so that you can go ahead and put your pretty layer on.
![]()
So, I added a nice fluffy layer of the icing, and used the flat side of a palette knife to make a simple decorative pattern on the cake. I personally like keeping it simple, but you can do whatever your heart desires. This cake keeps best in the fridge, so when you’re ready to serve, you can place on a cake pedestal for extra height and drama, or even just a nice plate works too. For best results, you should refrigerate the finished cake overnight before slicing (oh, the anticipation!).

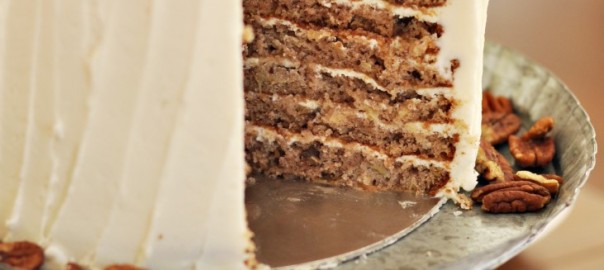
Best part: cutting into this cake. It’s always so fun to slice it open and see what’s going on in there! As predicted, it’s looking beyond delicious, and yep, sky-high. This cake was a huge hit at our Thanksgiving celebration, and, I have to say, it was ridiculously yummy. Mission accomplished! Okay, enough about my cake, here’s the recipe so you can get bakin’ and buildin’:
Sky-High Hummingbird Cake {click here for printable recipe}
Ingredients:
1 cup (110 grams) pecans, finely chopped
3 cups (390 grams) all-purpose flour
2 cups (400 grams) granulated sugar
1 teaspoon baking soda
1/2 teaspoon salt
1 teaspoon ground cinnamon
3 large eggs, lightly beaten
1 cup safflower, sunflower, or corn oil
2 teaspoons pure vanilla extract
8 ounce can crushed pineapple (and the juice)
2 cups mashed ripe bananas (about 4 bananas)
Method:
Preheat oven to 350 degrees F (180 degrees C) with rack in middle of oven. Prepare three 8″ round cake pans with butter/oil spray and a parchment circle on bottom of pan. Set aside.
In large mixing bowl, whisk together the flour, baking soda, sugar, salt, and cinnamon. Set aside.
In a separate large mixing bowl, combine lightly beaten eggs, vanilla, pecans, oil, bananas, and pineapple. Pour into dry ingredients and stir with wooden spoon until combined. Divide batter evenly into 3 prepared 8″ round pans. Bake until toothpick comes clean from centre of cake (about 30 minutes). Don’t open oven for first 20 minutes, then rotate pans, checking after 10 more minutes. Try not to overbake! Let cool on wire racks for 20 minutes, then inverting onto racks, removing parchment paper, until cool to the touch.
Adapted from Joy of Baking
Fluffy Cream Cheese Icing {click here for a printable recipe}
*Enough to frost and fill an 8″ round 6-layer cake
1/2 cup (1 stick, or 115 g) unsalted butter, room temperature
2 x 8 ounce packages cream cheese, cut into cubes, cold
2 lbs (about 7 1/4 cups icing sugar (confectioners)
2 teaspoons pure vanilla extract
Method:
Using electric mixer, combine butter and icing sugar until just combined. Add cold cream cheese, all at once, and beat on medium speed for about 4 minutes. Turn up to high speed for another 1 minute. Should be fluffy. Don’t overbeat, or the icing will start to lose thickness.
*To fill and frost the sky-high 8″ version of this cake, you will likely need to increase the icing recipe by 50%
Adapted from Joy of Baking
Assembly Tips and Tricks:
-
Wrapped baked layers in saran and refrigerate for a few hours before torting them
-
Always put a large piece of wax or parchment paper under the cake board (with the cake on it) while you work on icing the cake, to keep your turntable or other surface clean
-
Use small offset palette knife to spread icing between layers, and large palette knife and bench scraper to smooth icing onto sides when crumb-coating
-
Refrigerate crumb-coated cake until icing is no longer sticky before applying top decorative icing layer
-
Refrigerate completed cake overnight, if possible, before slicing